Setup a Bluesky server on Digital Ocean

Last week I took the plunge and started using Bluesky, the microblogging Twitter-like platform designed to be decentralized and portable. Thinking ahead, I decided to setup my own Bluesky personal data server (PDS) instead of signup for the default provider. This affords me greater control of my data and peace of mind should nefarious actors try to seize the platform (like what happened with Twitter.).
The process is fairly straight forward for those comfortable with web hosting, DNS and command-line interfaces. The official documentation is well written and should be referenced first as things will change in the future. As of November 2024, the PDS version stands at 0.4.
UPDATE: I posted this how-to video on YouTube if you'd prefer to watch instead of read:
Step 1: Deploy Bluesky Social PDS Droplet
If you haven't already done so, create an account on Digital Ocean, and on the homepage, click + New Project, give the project a name and under Purpose select Web application. Finally Click Create Project.
Once the project is created, we need to deploy a Droplet which is what Digital Ocean calls their containerized/virtualized applications. Click the Spin up a Droplet link inside your new project, select a region and datacenter you'd like to deploy it in, and then under Choose an image section, click on Marketplace and search for Bluesky Social PDS. Select and continue down the page.
The PDS is very light on server resources and can be deployed on the lowest tier should you choose. According to the official documentation, the recommended requirements for a PDS hosting 1-20 accounts is 1GB RAM, 1 CPU Core and 20GB of storage. Make your selections in the Choose Size section and then continue down the page.
Under Choose Authentication Method, select Password and create a very strong password as this will be the administrator/root password for the Droplet. Finally, give your Droplet a friendly hostname so it's easy to remember and click the Create Droplet button.
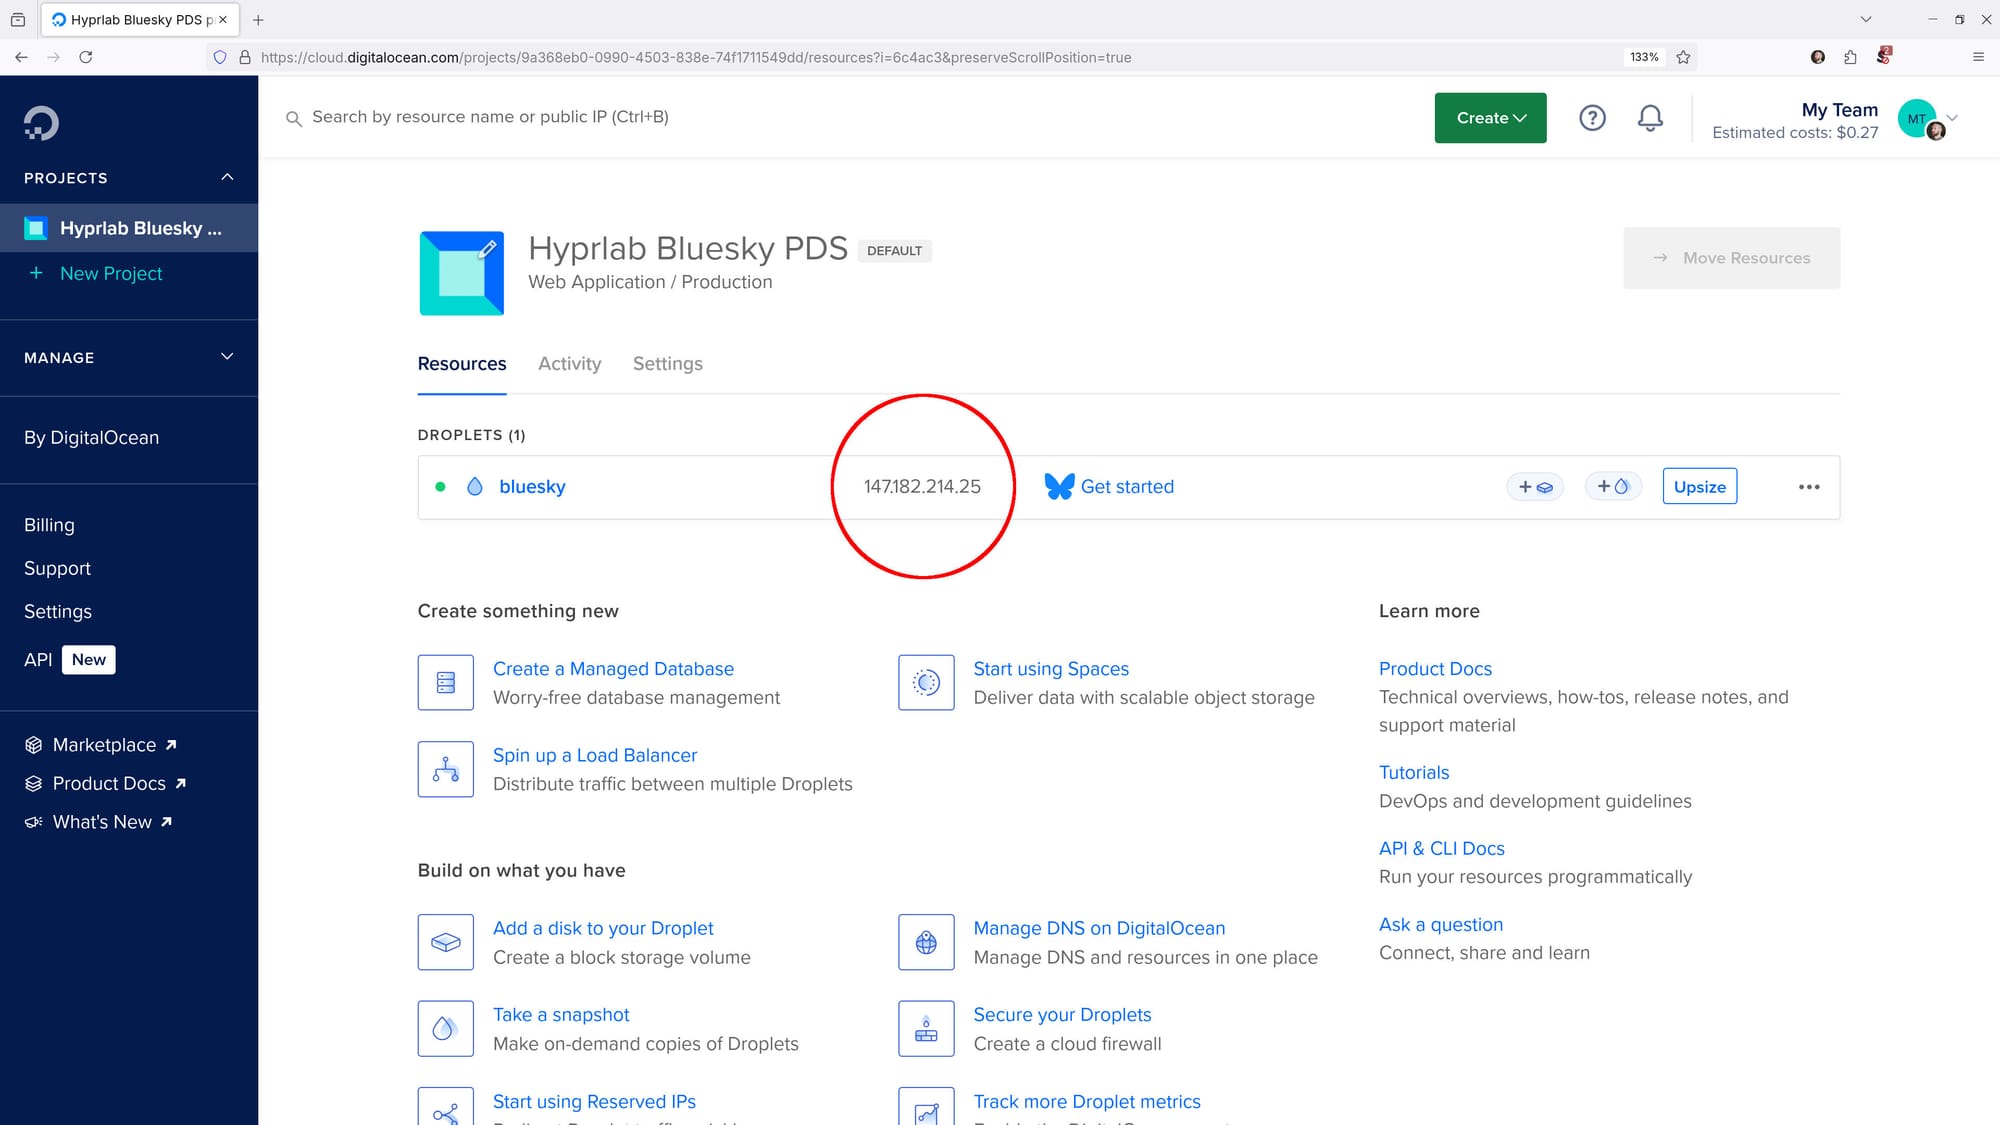
The Droplet will take a few seconds to create. Once created, the new Droplet will display an IP address. Click the IP address to copy.

Step 2: Configure DNS to point to the Droplet
Now we need to setup our domain so that it points to the Droplet. Purchase a domain if you haven't already done so, and then go to your domain's DNS settings page and enter in two A-type record entries.
The first entry will point the domain to our Droplet's IP address. In my case, I am setting up a subdomain to do this blueskypds.hyprlab.co. The second entry needs to be a wild-card and to do that we add an * in front of the domain as shown below. Be sure to change the IP address to match the one from your Droplet.
blueskypds.hyprlab.co points to 147.182.214.25
*blueskypds.hyprlab.co points to 147.182.214.25
Step 3: Launch Droplet console and PDS installer
Return to the Digital Ocean project page and on the right hand side of the Droplet row, click the ellipses ... menu and select Access console. On the next page, click the Launch Droplet Console button and a terminal window will appear with the Bluesky PDS installer already launched.
installer.sh                  100%[==============================================>]  12.98K  --.-KB/s    in 0s

2024-11-22 11:49:00 (69.9 MB/s) - ‘installer.sh’ saved [13289/13289]

* Detected supported distribution Ubuntu 22.04 LTS
---------------------------------------
     Add DNS Record for Public IP
---------------------------------------

  From your DNS provider's control panel, create the required
  DNS record with the value of your server's public IP address.

  + Any DNS name that can be resolved on the public internet will work.
  + Replace example.com below with any valid domain name you control.
  + A TTL of 600 seconds (10 minutes) is recommended.

  Example DNS record:

    NAME                TYPE   VALUE
    ----                ----   -----
    example.com         A      147.182.214.25
    *.example.com       A      147.182.214.25

  **IMPORTANT**
  It's recommended to wait 3-5 minutes after creating a new DNS record
  before attempting to use it. This will allow time for the DNS record
  to be fully updated.

Enter your public DNS address (e.g. example.com):
At the prompt, enter the domain we just created. In this case blueskypds.hyprlab.co and press enter. It will then prompt you for an administrator email address. This does not have to be connected to your domain so you can use your Gmail, iCloud etc. here if you so choose. Press enter and the setup will fully commence. This process may take a few minutes. Once completed you will receive a summary of the changes along with your domain name displayed and, if connected properly, the Droplet IP address we received in Step 1.
If you don't see the IP address here, your DNS has not propagated yet. Press Control + C to exit the installer, wait a few minutes and then enter the following command to initiate the installer shell script again: sudo bash installer.sh
========================================================================
PDS installation successful!
------------------------------------------------------------------------

Check service status      : sudo systemctl status pds
Watch service logs        : sudo docker logs -f pds
Backup service data       : /pds
PDS Admin command         : pdsadmin

Required Firewall Ports
------------------------------------------------------------------------
Service                Direction  Port   Protocol  Source
-------                ---------  ----   --------  ----------------------
HTTP TLS verification  Inbound    80     TCP       Any
HTTP Control Panel     Inbound    443    TCP       Any

Required DNS entries
------------------------------------------------------------------------
Name                         Type       Value
-------                      ---------  ---------------
blueskypds.hyprlab.co              A          147.182.214.25
*.blueskypds.hyprlab.co            A          147.182.214.25

Detected public IP of this server: 147.182.214.25

To see pdsadmin commands, run "pdsadmin help"

========================================================================
Create a PDS user account? (y/N):
Now we need to create our first PDS user account. Press y and enter to continue. Enter an email address for this user. Again it can be a personal one. Press enter and then it will prompt us for our handle. This is the handle that will be seen on the Bluesky network and for now, it must start with a username followed by our domain/subdomain. In this case, I'm using jason.blueskypds.hyprlab.co. Press enter and if successful you will be greeted with a summary of your account including your handle, DID and password. IMPORTANT: Copy all of these values and store them in a safe place! The password can not be displayed again once we leave the console.
Create a PDS user account? (y/N): y
Enter an email address (e.g. [email protected]): [email protected]
Enter a handle (e.g. alice.blueskypds.hyprlab.co): jason.blueskypds.hyprlab.co

Account created successfully!
-----------------------------
Handle   : jason.blueskypds.hyprlab.co
DID      : did:plc:42s4fhoka5j5fj6uhomeza2v
Password : SY4uMqePyn52QBe4vjOjTrJp
-----------------------------
Save this password, it will not be displayed again.

root@bluesky:~#
Type exit to leave the console and click Close
Step 4: Setup SMTP service using SendGrid
We now need to setup a SMTP service to allow our Droplet to send verification and password reset emails. This can be done with any SMTP provider including Gmail however, for this guide I am going to use SendGrid. First, go to sendgrid.com and signup for a account. They offer a free tier that allows you to send 100 emails per month. After your account is setup, we need to verify a sender email address which will be in the from and reply sections of your emails. To do this, from the Dashboard click on Settings > Sender Authentication. You may use any email address, including personal ones, as your sender. Click on the button that says Verify a Single Sender, fill out and complete the form, then click Create. You will then receive an email at that address from SendGrid asking you to verify the Sender.
Once verified, return to the Settings section and click on API Keys. Click Create API Key button, give your key a name, select Full Access and then click Create & View. Your API key will be displayed on the next page. IMPORTANT: Copy this API key and store it in a safe place! You will not be able to view it again once you navigate away from this page.
Now that we have SendGrid setup and our API key copied, return to our Digital Ocean Droplet's console. We now need to edit the PDS environment file. At the prompt, enter the following:
nano /pds/pds.envThis will open the file in Nano, a simple text editor. Move the cursor to the first empty line and copy the following two lines, editing the values so they match your sender email and include the API key where it has <your api key>:
[email protected]
PDS_EMAIL_SMTP_URL=smtps://apikey:<your api key here>@smtp.sendgrid.net:465/
Here is what my pds.env file looks like in it's entirety:
PDS_HOSTNAME=blueskypds.hyprlab.co
PDS_JWT_SECRET=cb6bfbdda60701df85050a3a393b1444
PDS_ADMIN_PASSWORD=0237d67a1ad2f944234d4464a6892234
PDS_PLC_ROTATION_KEY_K256_PRIVATE_KEY_HEX=f0b7d0c617a75f401c72f42b0eb165ff3049a813b851c370efcd02dbcb7e87d5
PDS_DATA_DIRECTORY=/pds
PDS_BLOBSTORE_DISK_LOCATION=/pds/blocks
PDS_BLOB_UPLOAD_LIMIT=52428800
PDS_DID_PLC_URL=https://plc.directory
PDS_BSKY_APP_VIEW_URL=https://api.bsky.app
PDS_BSKY_APP_VIEW_DID=did:web:api.bsky.app
PDS_REPORT_SERVICE_URL=https://mod.bsky.app
PDS_REPORT_SERVICE_DID=did:plc:ar7c4by46qjdydhdevvrndac
PDS_CRAWLERS=https://bsky.network
LOG_ENABLED=true
[email protected]
PDS_EMAIL_SMTP_URL=smtps://apikey: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@smtp.sendgrid.net:465/
Press Control + O to overwrite the file and press Enter. Then Control + X to exit Nano. Because we edited the environment file, we need to restart the PDS service so it updates with our changes. Enter the following command:
systemctl restart pdsWhen complete type exit and then click Close.
Step 5: Log in on Bluesky
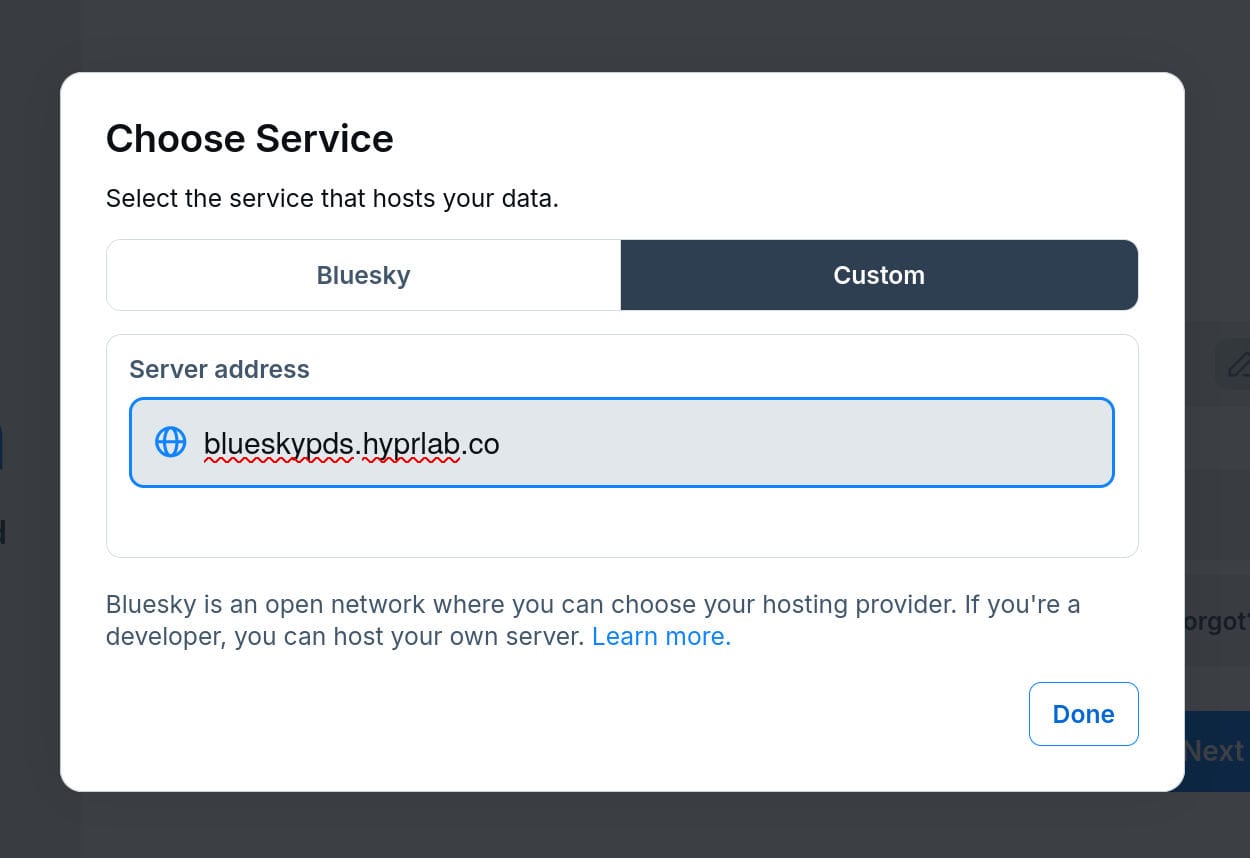
We have completed the setup for our Droplet, now it's time to connect to our new account on Bluesky. Go to https://bsky.app and click Sign in. Under Hosting provider, click the pencil icon and then choose Custom under Service. Now we will enter our domain under Server address and click Done.

Now we need to enter in our handle, in this case jason.blueskypds.hyprlab.co and the password given to us in the console earlier during setup. Click Next to continue.
If successful, you will be greeted with a window asking you to verify your email address. Since we setup SMTP in the previous step, go ahead and verify your account. You are now signed into Bluesky using your own personal data server and unique domain-based handle! Your profile may display an Invalid Handle message upon first logging in. I've found this goes away eventually and it may be tied to verifying your email account so I wouldn't delay doing that.
Step 6: Create automated update task (optional)
In order to keep our PDS updated with the latest code, let's create a cron task that runs every night at 3am. Go to the Droplet console and enter this command to display the crontab file in Nano:
sudo crontab -eNext, add this line to the first blank row in the file:
0 3 * * * /usr/local/bin/pdsadmin updateThen save by pressing Control + O to overwrite the file then Control + X to exit. If you wish to confirm that the cron job is scheduled, enter sudo crontab -l to display the cron jobs. When finished, exit the console by typing exit and then click Close
Step 7: Changing your handle to your domain (optional)
One final step you could take is using your domain name as your primary handle. For example, my Bluesky handle is my top-level domain @hyprlab.co. When I initially setup my PDS, I had a similar subdomain style handle to the one we used for this guide jason.blueskypds.hyprlab.co.
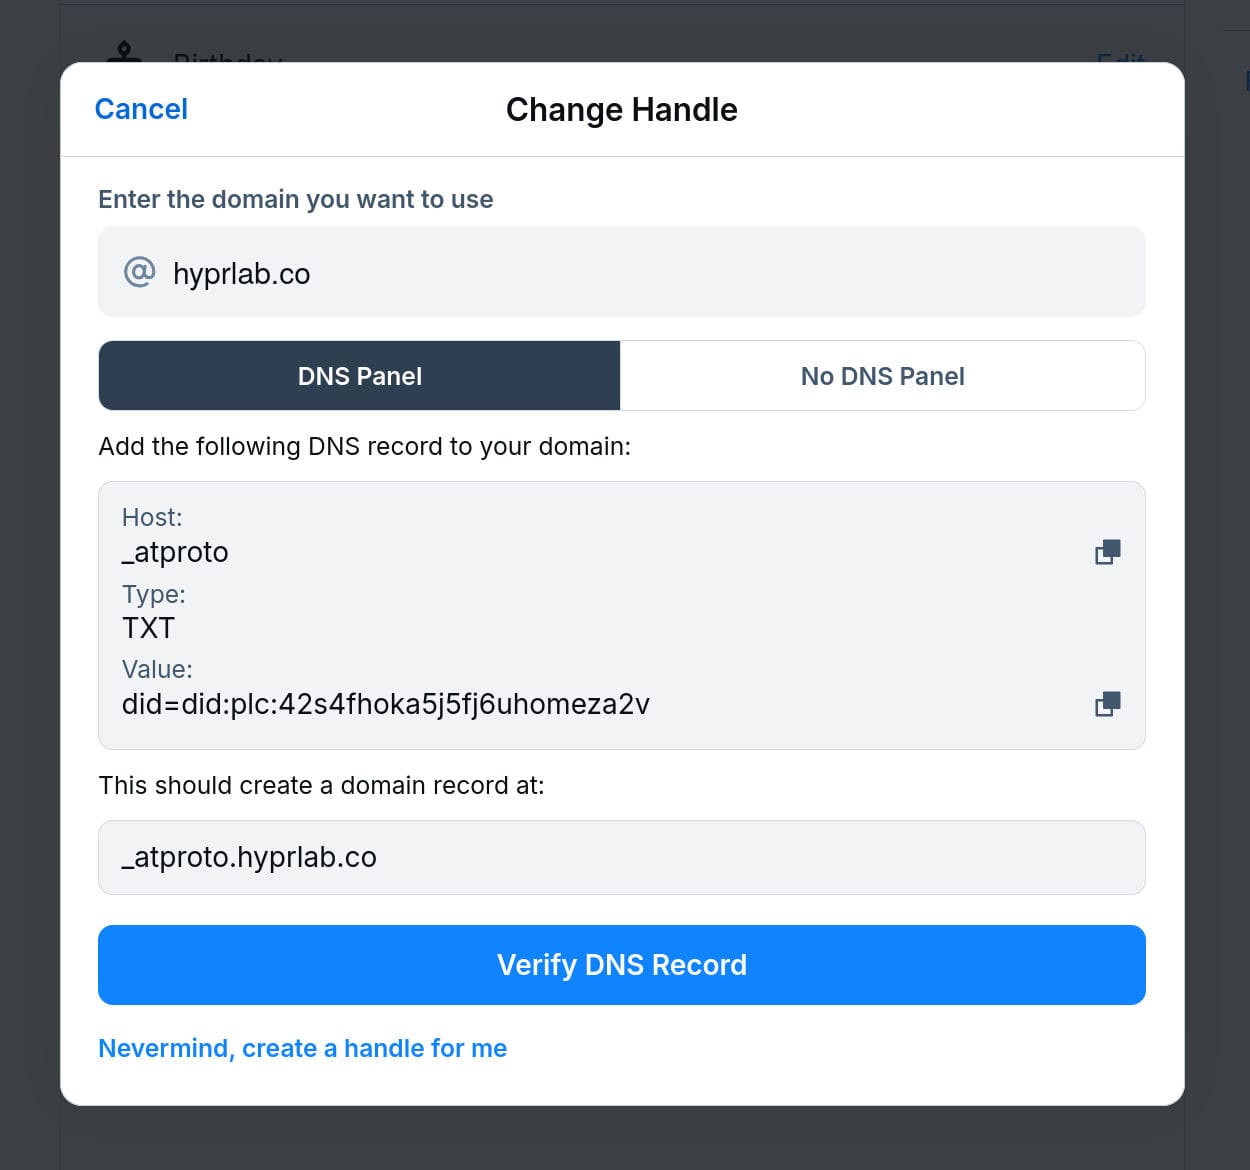
To change handles, login to your Bluesky account on bsky.app and navigate to Settings > Account > Handle. On the popup that appears, click I have my own domain. Enter the domain at the top and then copy the did= value. For me, this looks like
did=did:plc:42s4fhoka5j5fj6uhomeza2vWe now need to go back to our domain registrar and enter in a TXT record that looks like the following (but with your DID instead of mine):
Type: TXT
Name: _atproto
Value: did=did:plc:42s4fhoka5j5fj6uhomeza2v
Once this is saved, return to Bluesky and click Verify DNS Record. Once verified, your handle will now be changed to your domain.

Final thoughts
The Bluesky platform is rapidly growing and some of the processes outlined here are bound to depreciate over time. I will continue to update this guide as best I can but always refer to the official documentation and connect to the AT Protocol PDS Admin Discord for the most up-to-date information.
I can be reached on Bluesky @hyprlab.co


