Build your own web server at home
Many of us have powerful internet connections at home with symmetrical upload and download speeds. Let's build a web server to take full advantage of all that bandwidth! Some pre-flight checks before we dive in:
- We will be replacing your existing router with pfSense and re-configuring the network. This means you will need an additional computer for the pfSense install. If your existing router has built-in wifi, you will need to reconfigure it as an access point for this new setup.
- A direct connection to your modem/gateway is required. Ideally this should provide us with your public IP. If your modem/gateway provides you with a local address (ie. 10.x.x.x, 192.168.x.x, 172.x.x.x) then you will need to perform additional configuration to point traffic to the new pfSense router and/or disable DHCP on the modem/gateway.
- A spare computer to install pfSense
- A spare computer or VM to use as your web server. A bare-metal install will be covered here however the setup is very similar if you're using a VM. Additional configuration outside the scope of this guide may be required to get the VM connected to the router properly.
- A free or paid account with a dynamic DNS provider. NoIP is used in this guide but any dDNS provider compatible with pfSense will do
- Optional: top-level domain (ie. myserver.com, .net, .co etc)
- A 2 or 4 point ethernet NIC (network interface card)
- 2 USB flash drives for installation
- Some patience and tender care
Let's begin!
First it may be helpful to visualize how the network will look from a high-level:
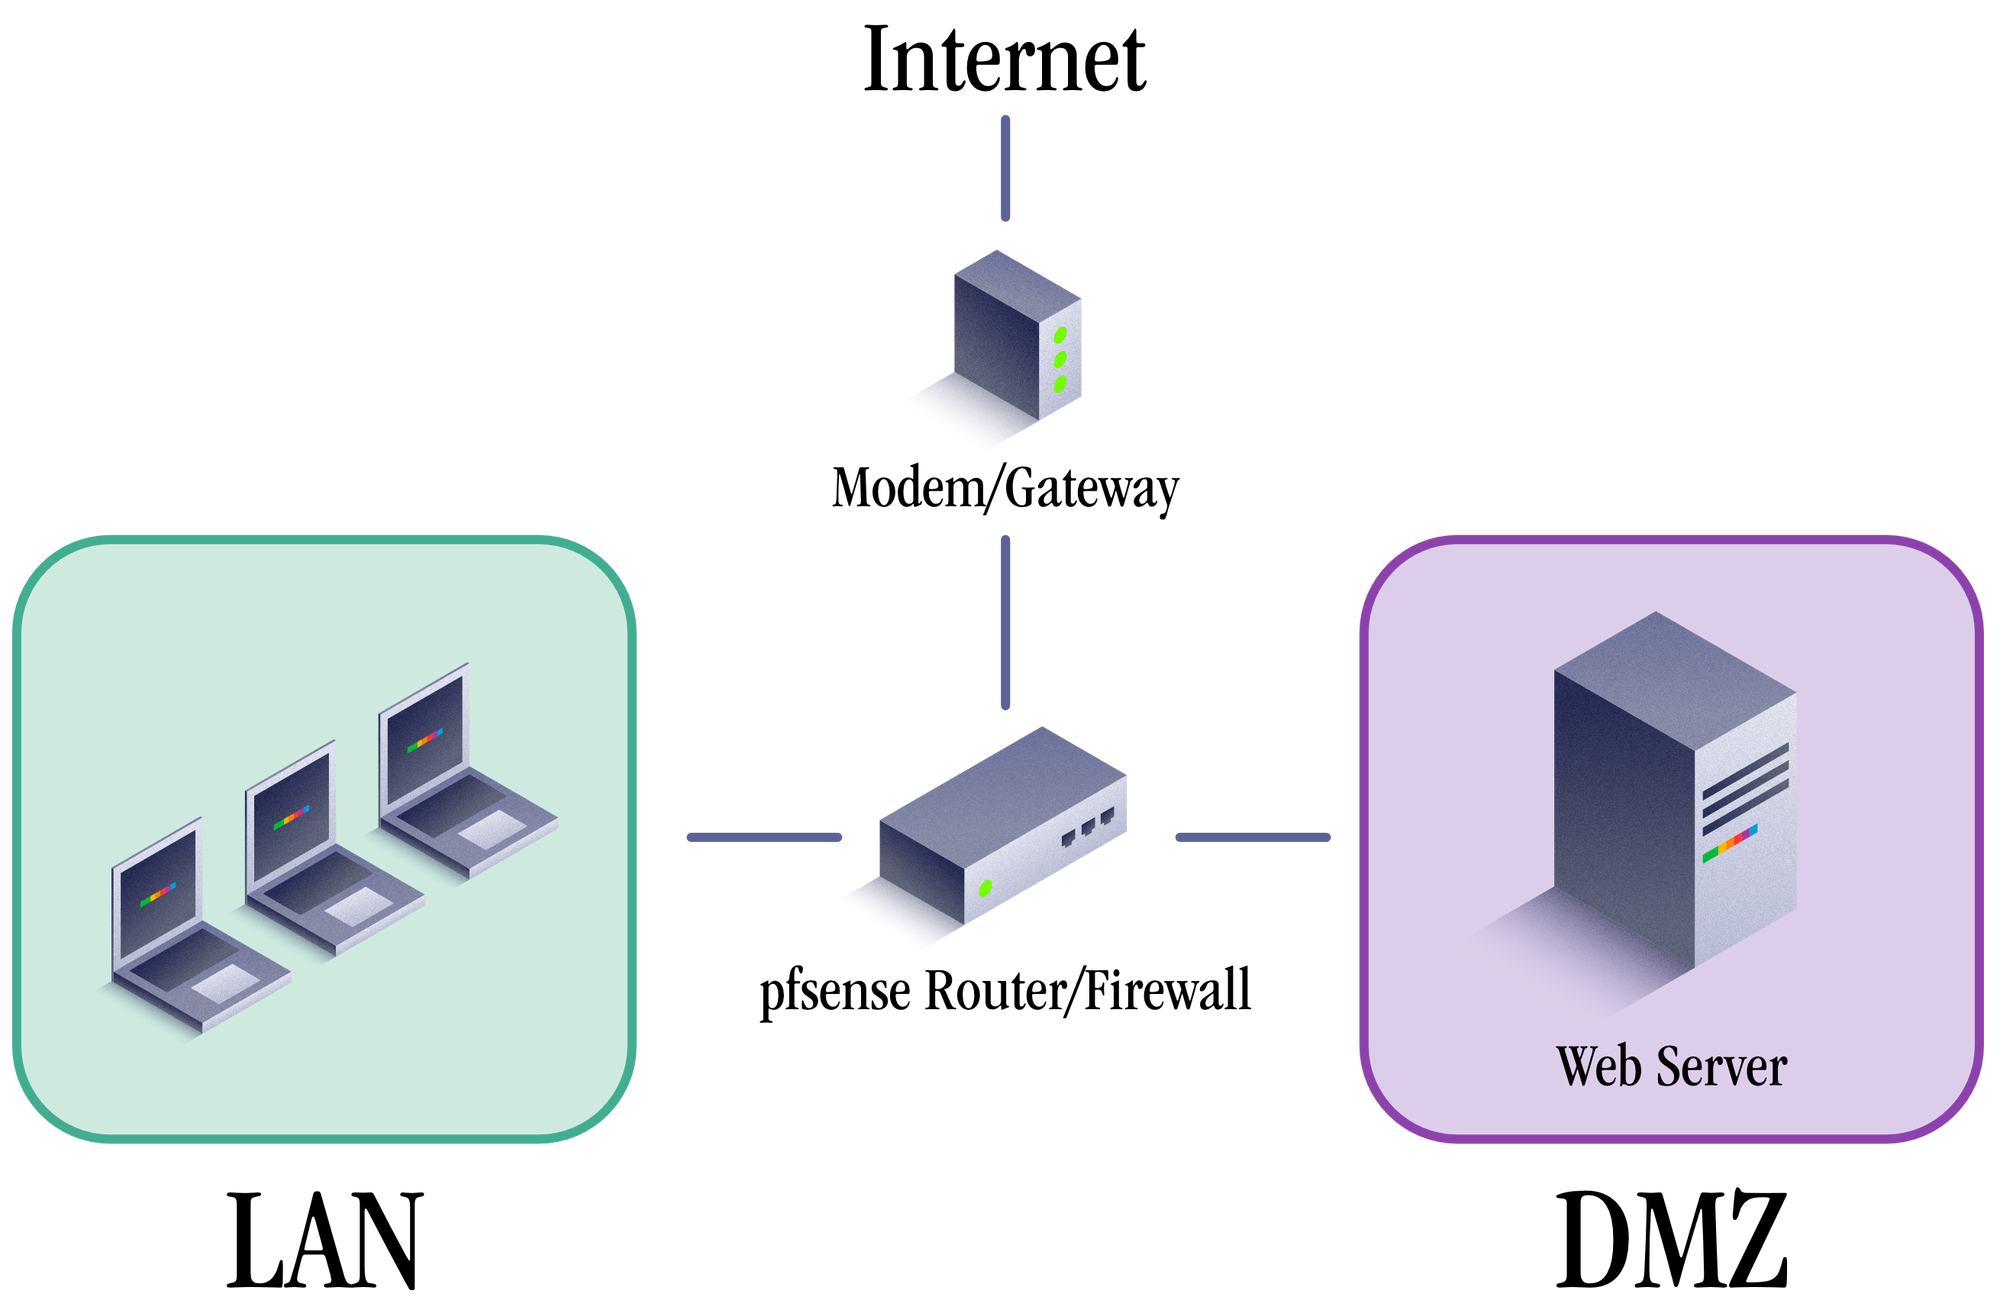
This network has 4 basic parts
- A modem/gateway to the internet
- A pfSense router/firewall that will route traffic to the appropriate destinations and zones
- A protected LAN where your computer and other devices will connect
- A DMZ or Demilitarized Zone where you will place your web server to isolate it's traffic from the rest of the network. This is a separate network with it's own IP address scheme etc.
The centerpiece of all of this is the pfSense router/firewall. It allows us to isolate our public facing networks (DMZ) and private facing networks (LAN) for security and provides communication with our web server on the DMZ from the LAN. It will route web traffic on ports 80 and 443 from the internet to our server in the DMZ without endangering or exposing our LAN devices. First, let's get our hardware prepped for pfsense.
pfSense hardware configuration
For our setup, we need a computer with at least 3 network ports:
- One port for our WAN connection to the Internet
- One port for our LAN
- One port for our DMZ
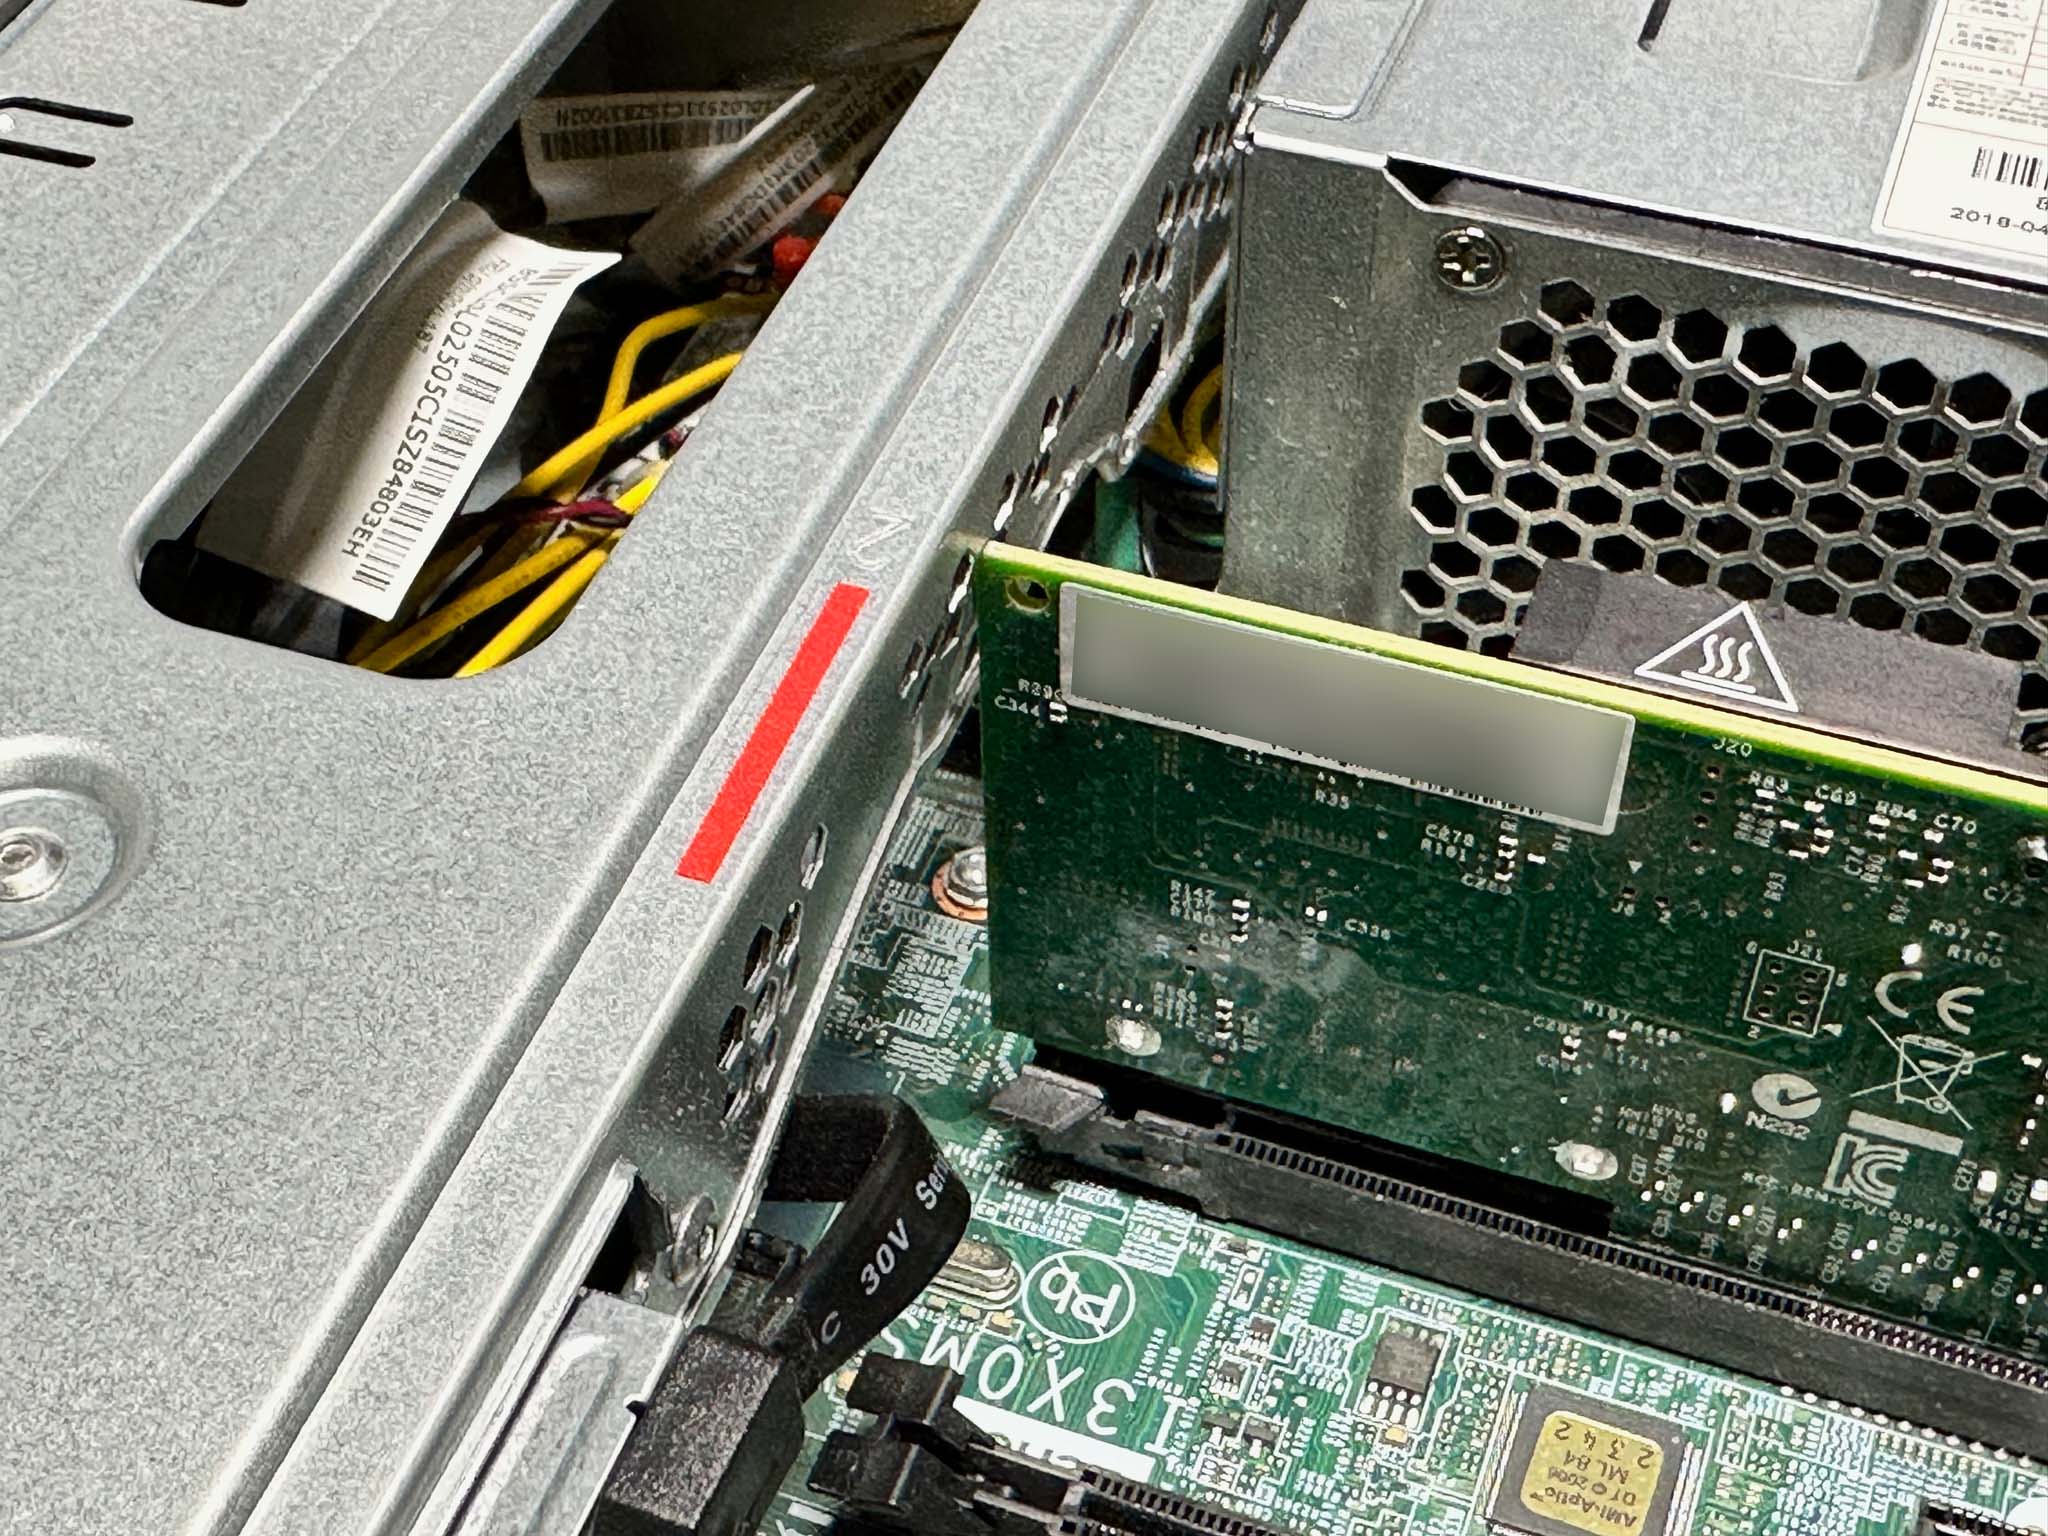
For most machines, this will require adding a PCIe network interface card with two or more ethernet ports. For my build, I chose to future proof the system with an Intel X450-T2 that features dual 10 gbit ethernet ports. This card can be found used for around $50 on ebay.
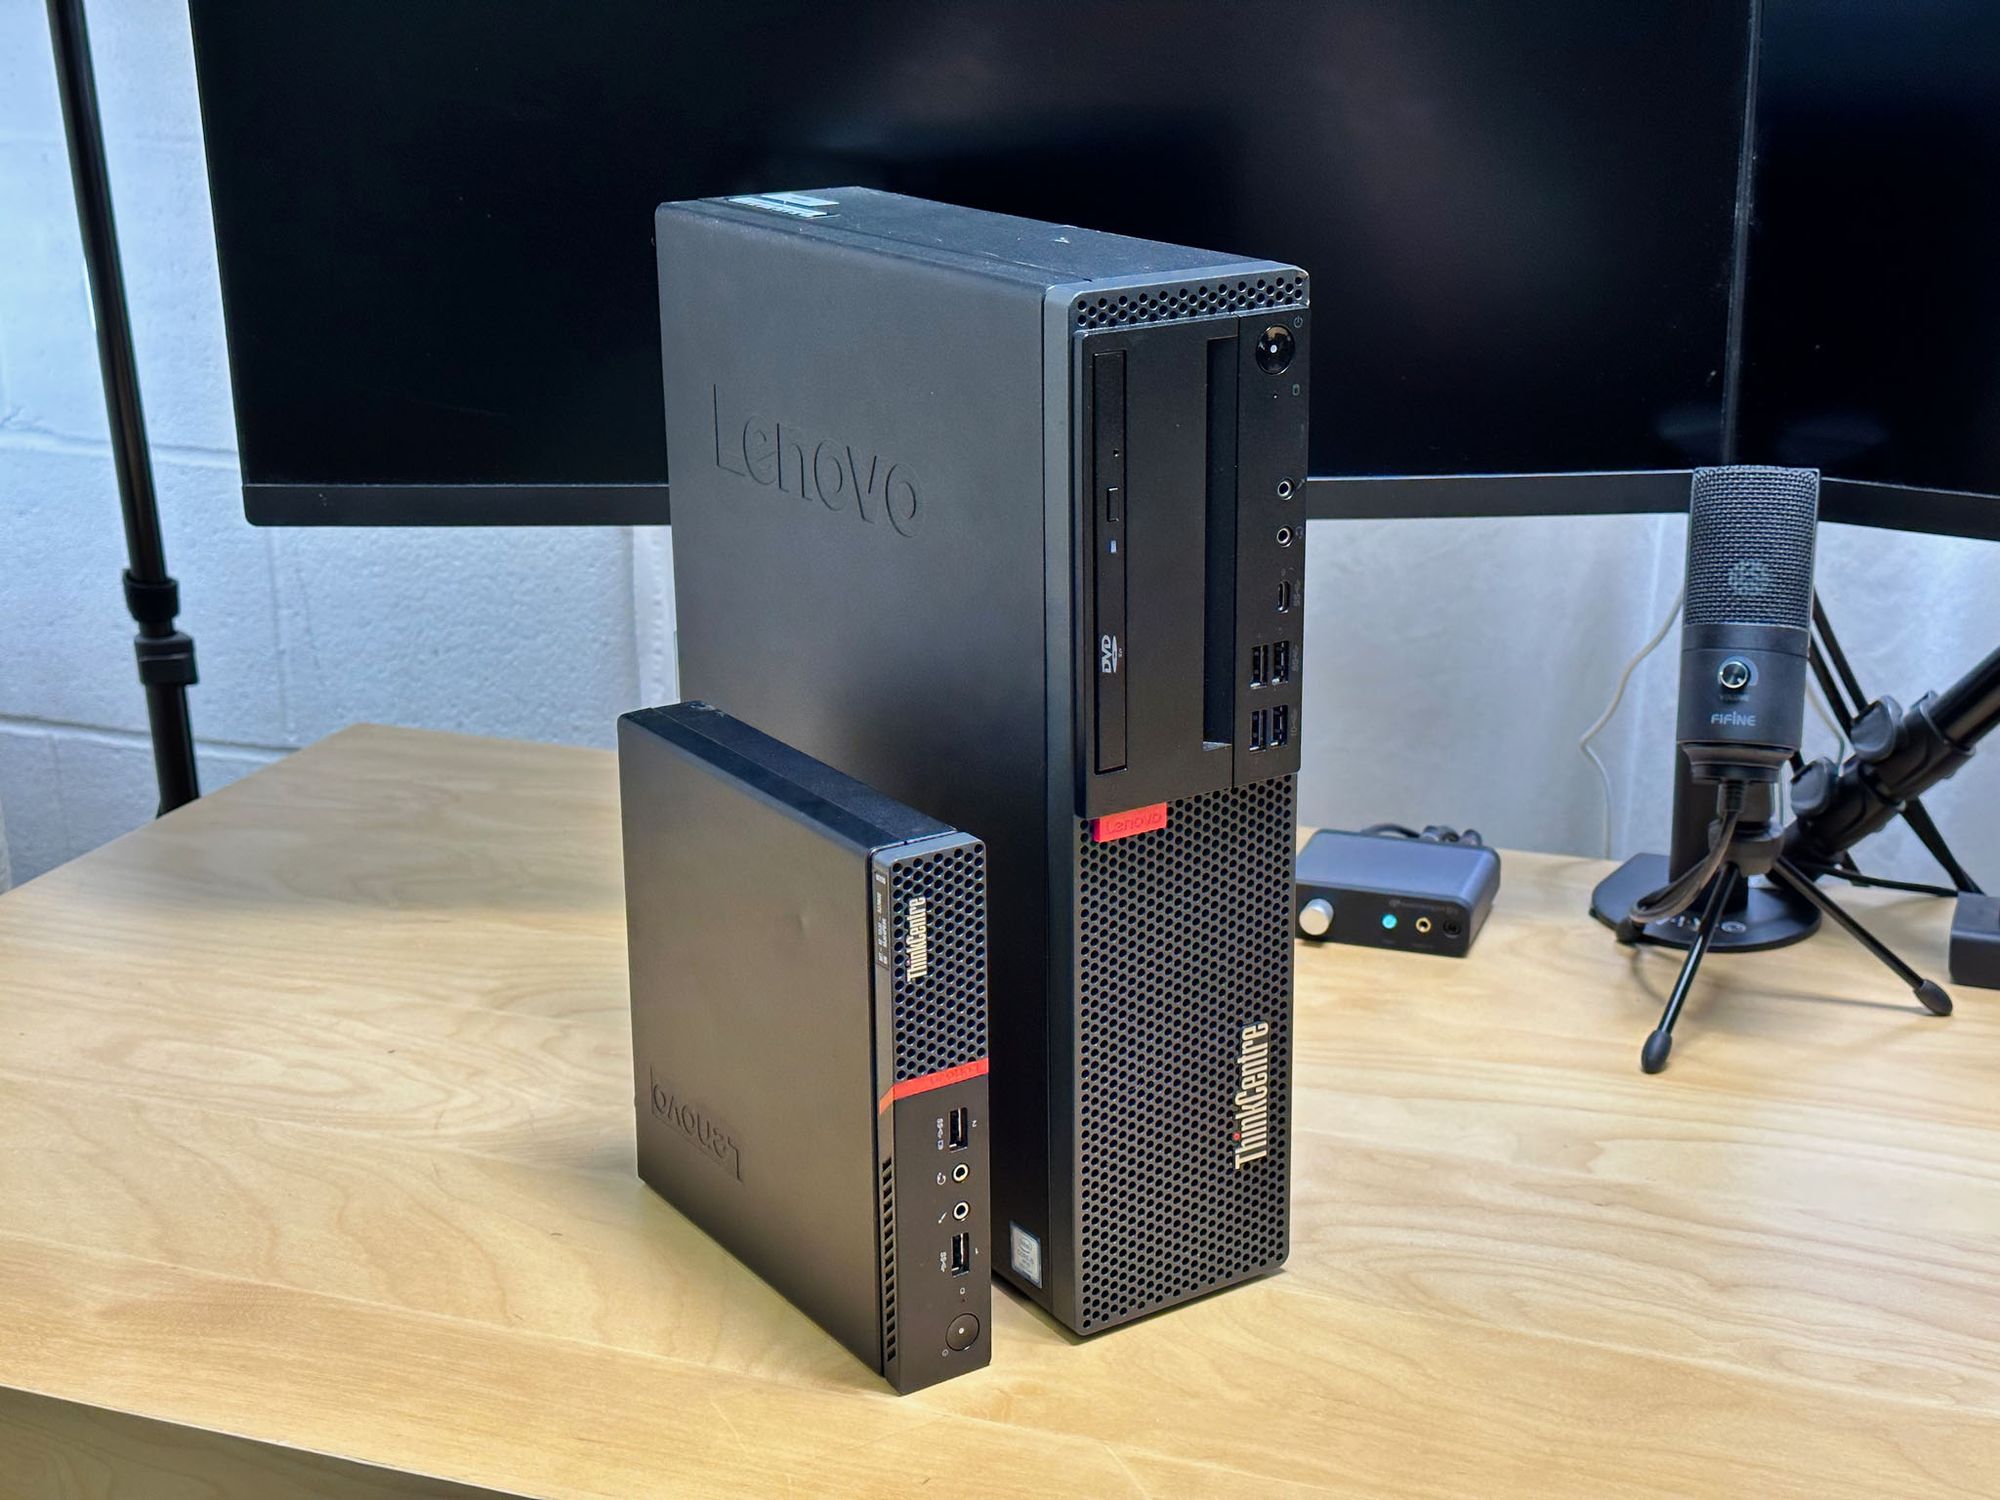
Next I purchased a Lenovo ThinkCentre 920S on ebay for $200. It came with a 8th generation Intel Core i5-8500, 8GB of RAM and a 256GB NVMe SSD. This is more than enough processor power and RAM to handle the routing tasks. It's also a power-efficient system that runs whisper quiet. The built-in 1 gigabit Intel i210 ethernet port will serve as our DMZ port. pfsense requires at least 32GB of SSD space.
Let's first install the NIC in the ThinkCentre using a low-profile bracket. Please note, the Intel X450-T2 will be a tight fit and may require bending the hard drive cage slightly.
Next, boot the system in to the BIOS and set the power settings to Always On. This way, if you suffer a power outage, the machine will automatically boot when power returns.
While in the BIOS, set the boot parameters to UEFI. Save and restart.
Prepare pfSense installation media
pfSense is a router and firewall operating system based on FreeBSD that runs on x86 PC hardware. It's robust, flexible, open source and secure. There are two versions: a community edition and a paid edition. Netgate is the maintainer of the project and sells router devices with pfSense pre-installed but makes the software available free of charge through the community edition.
In this guide, we will be using the community edition. You can download it here. At the time of this writing version 2.7.0 is the newest available release. Download the AMD64 version, DVD ISO. This will download compressed as a .gz file. On Mac or Linux, decompress this file. On Windows, you may need to download a third-party decompressor like 7Zip.
Next, download Balena Etcher, a program that writes bootable ISO images to USB thumb drives.
Insert your thumbdrive and open Balena Etcher. Select the downloaded pfSense ISO image and then select your thumbdrive. NOTE: This will erase everything on your thumbdrive so please be mindful!
Create the bootable thumbdrive and when finished insert it into the ThinkCentre.
Boot and install pfSense
When you power on the ThinkCentre, immediately press Enter to load the boot selection screen and on the list of options, select your USB thumbdrive.
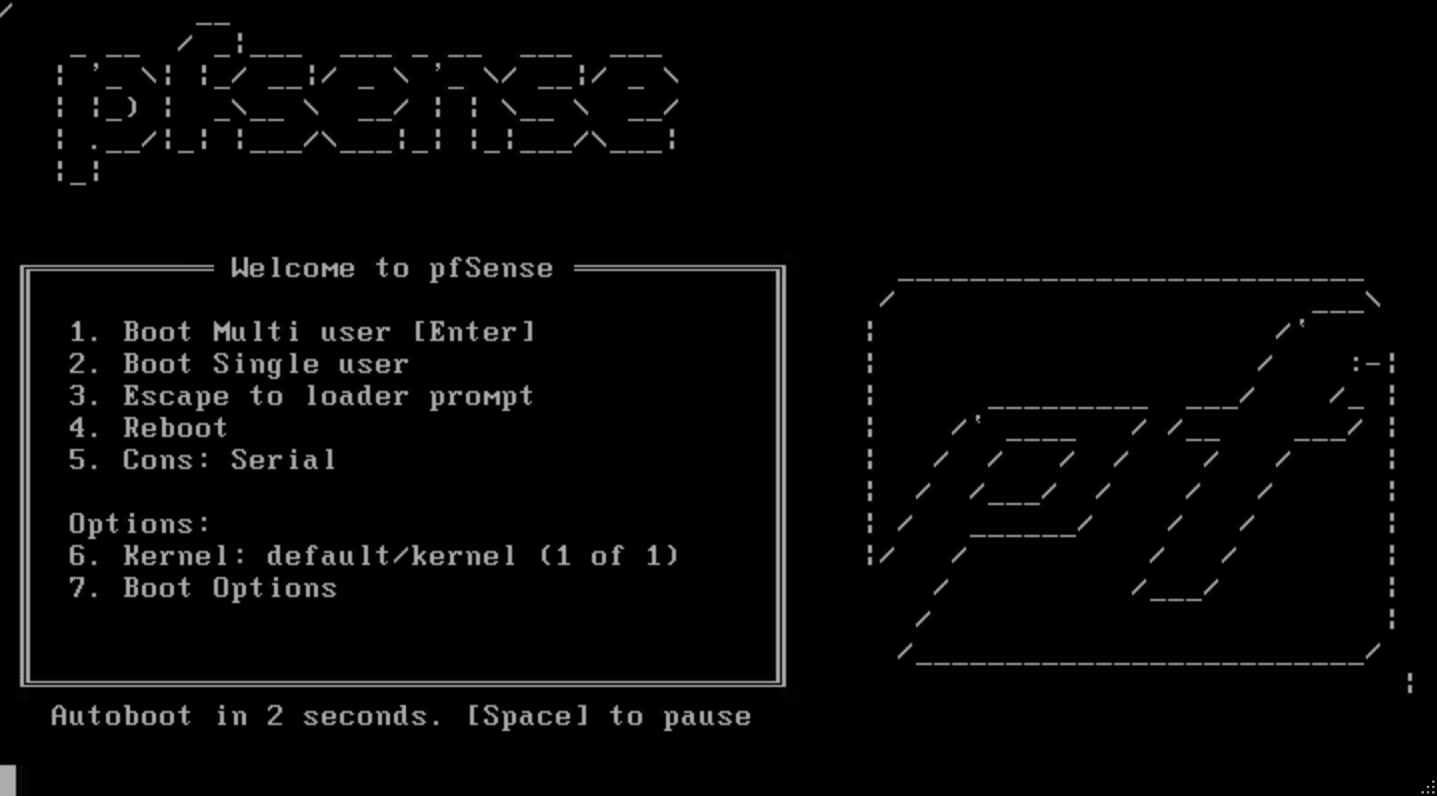
Allow the bootloader to auto-boot into the installer. When finished loading, accept the terms and conditions and then select Install pfSense from the list of options.
Select the defaults at each prompt and then install the base system. When complete, it will ask you to reboot. Remove the USB thumbdrive and reboot.
Connect your WAN and LAN ethernet cables to the ThinkCentre at this point.
Once loaded, the system will prompt you with a number of questions, first of which it will ask if you want to setup VLANs now or later. Type n and press enter.
Next it will ask which of the interfaces you want to use for the WAN. Select one of the ports on the Intel X450 NIC
Enter the WAN interface name or 'a' for auto detection
(ix0 ix1 em0 or a): ix0
Next, the LAN interface. Select one of the ports on the Intel X450 NIC
Enter the LAN interface name or 'a' for auto detection
NOTE: This enables full Firewalling/NAT mode.
(ix1 em0 a or nothing if finished): ix1
Finally enter the DMZ interface. pfsense labels this as the Optional 1 interface. We will select the built-in Intel i210 ethernet port for this
Enter the Optional 1 interface name or 'a' for auto detection
(em0 a or nothing if finished): em0
The setup will now confirm the interface assignments. Press y to confirm. The bootup will complete and then display the IP addresses for each interface. Make sure the WAN and LAN ports are giving us the IP addresses before proceeding. It may be difficult to determine which physical port corresponds to each assignment so some trial and error may be necessary. I highly recommend creating a label sticker to mark each port for future reference.
Write down the LAN IP address for the next step. By default, pfSense uses 192.168.1.1
At this point, we no longer need to directly access the pfSense machine as the rest of the configuration can occur through the web interface. Disconnect any monitor, keyboard etc and continue setup on your computer.
Configure pfSense and DMZ
Navigate your web browser to http://192.168.1.1 pfSense will next ask you to specify an admin password. Define your password and proceed to the dashboard.

Let's configure the DMZ network next. The idea behind a demilitarized zone (DMZ) is to completely wall-off our public-facing servers from our local network and control traffic and packets between them in a systematic way. This means the DMZ will be on a completely different subnet than our LAN. For example, my LAN uses 10.0.1.0/24 while my DMZ has a subnet of 10.7.1.0/24. The only way these networks can communicate with each other is through our pfSense firewall.
Click Interfaces at the top and on the dropbox select Optional 1.
On the configuration page, checkmark Enable Interface and beneath give it the name DMZ.
Under IPv4 Configuration Type: select Static
Scroll down to the Static IPv4 Configuration section and define the IPv4 Address. Let's use 10.7.1.1/24
Click Save
Configure pfSense firewall
We now have to configure the firewall settings to allow the appropriate traffic in and out of the various zones. Let's begin with the NAT settings to send inbound web traffic to our server in the DMZ.
On the header, click Firewall > NAT then click the green Add button to add a new NAT rule.
Interface: select WAN
Destination: select WAN Address
Destination port range: select HTTP for both From port and To port
Redirect target IP: Select Single Host under Type and then specify the IP address of our web server. Let's use 10.7.1.2
Redirect target port: Select HTTP from the dropdown
Click Save
Follow this same process to add a NAT rule for port 443 and optionally 22 for SSH if you wish to access SSH remotely.
Next we will allow web traffic from the WAN to the DMZ so that our web server will be reachable from the outside world. To do this, we need to specify 2 new rules. Click Firewall > Rules, select WAN then click the green Add button to add a new rule to the bottom of the list.
On the next page, select the following options to enable HTTP port 80 traffic:
Action: Pass
Interface: WAN
Source: Any
Destination: DMZ net
Destination port range: Select HTTP from both dropdowns
Click Save
Do the same process again for HTTPS port 443 and optionally SSH port 22.
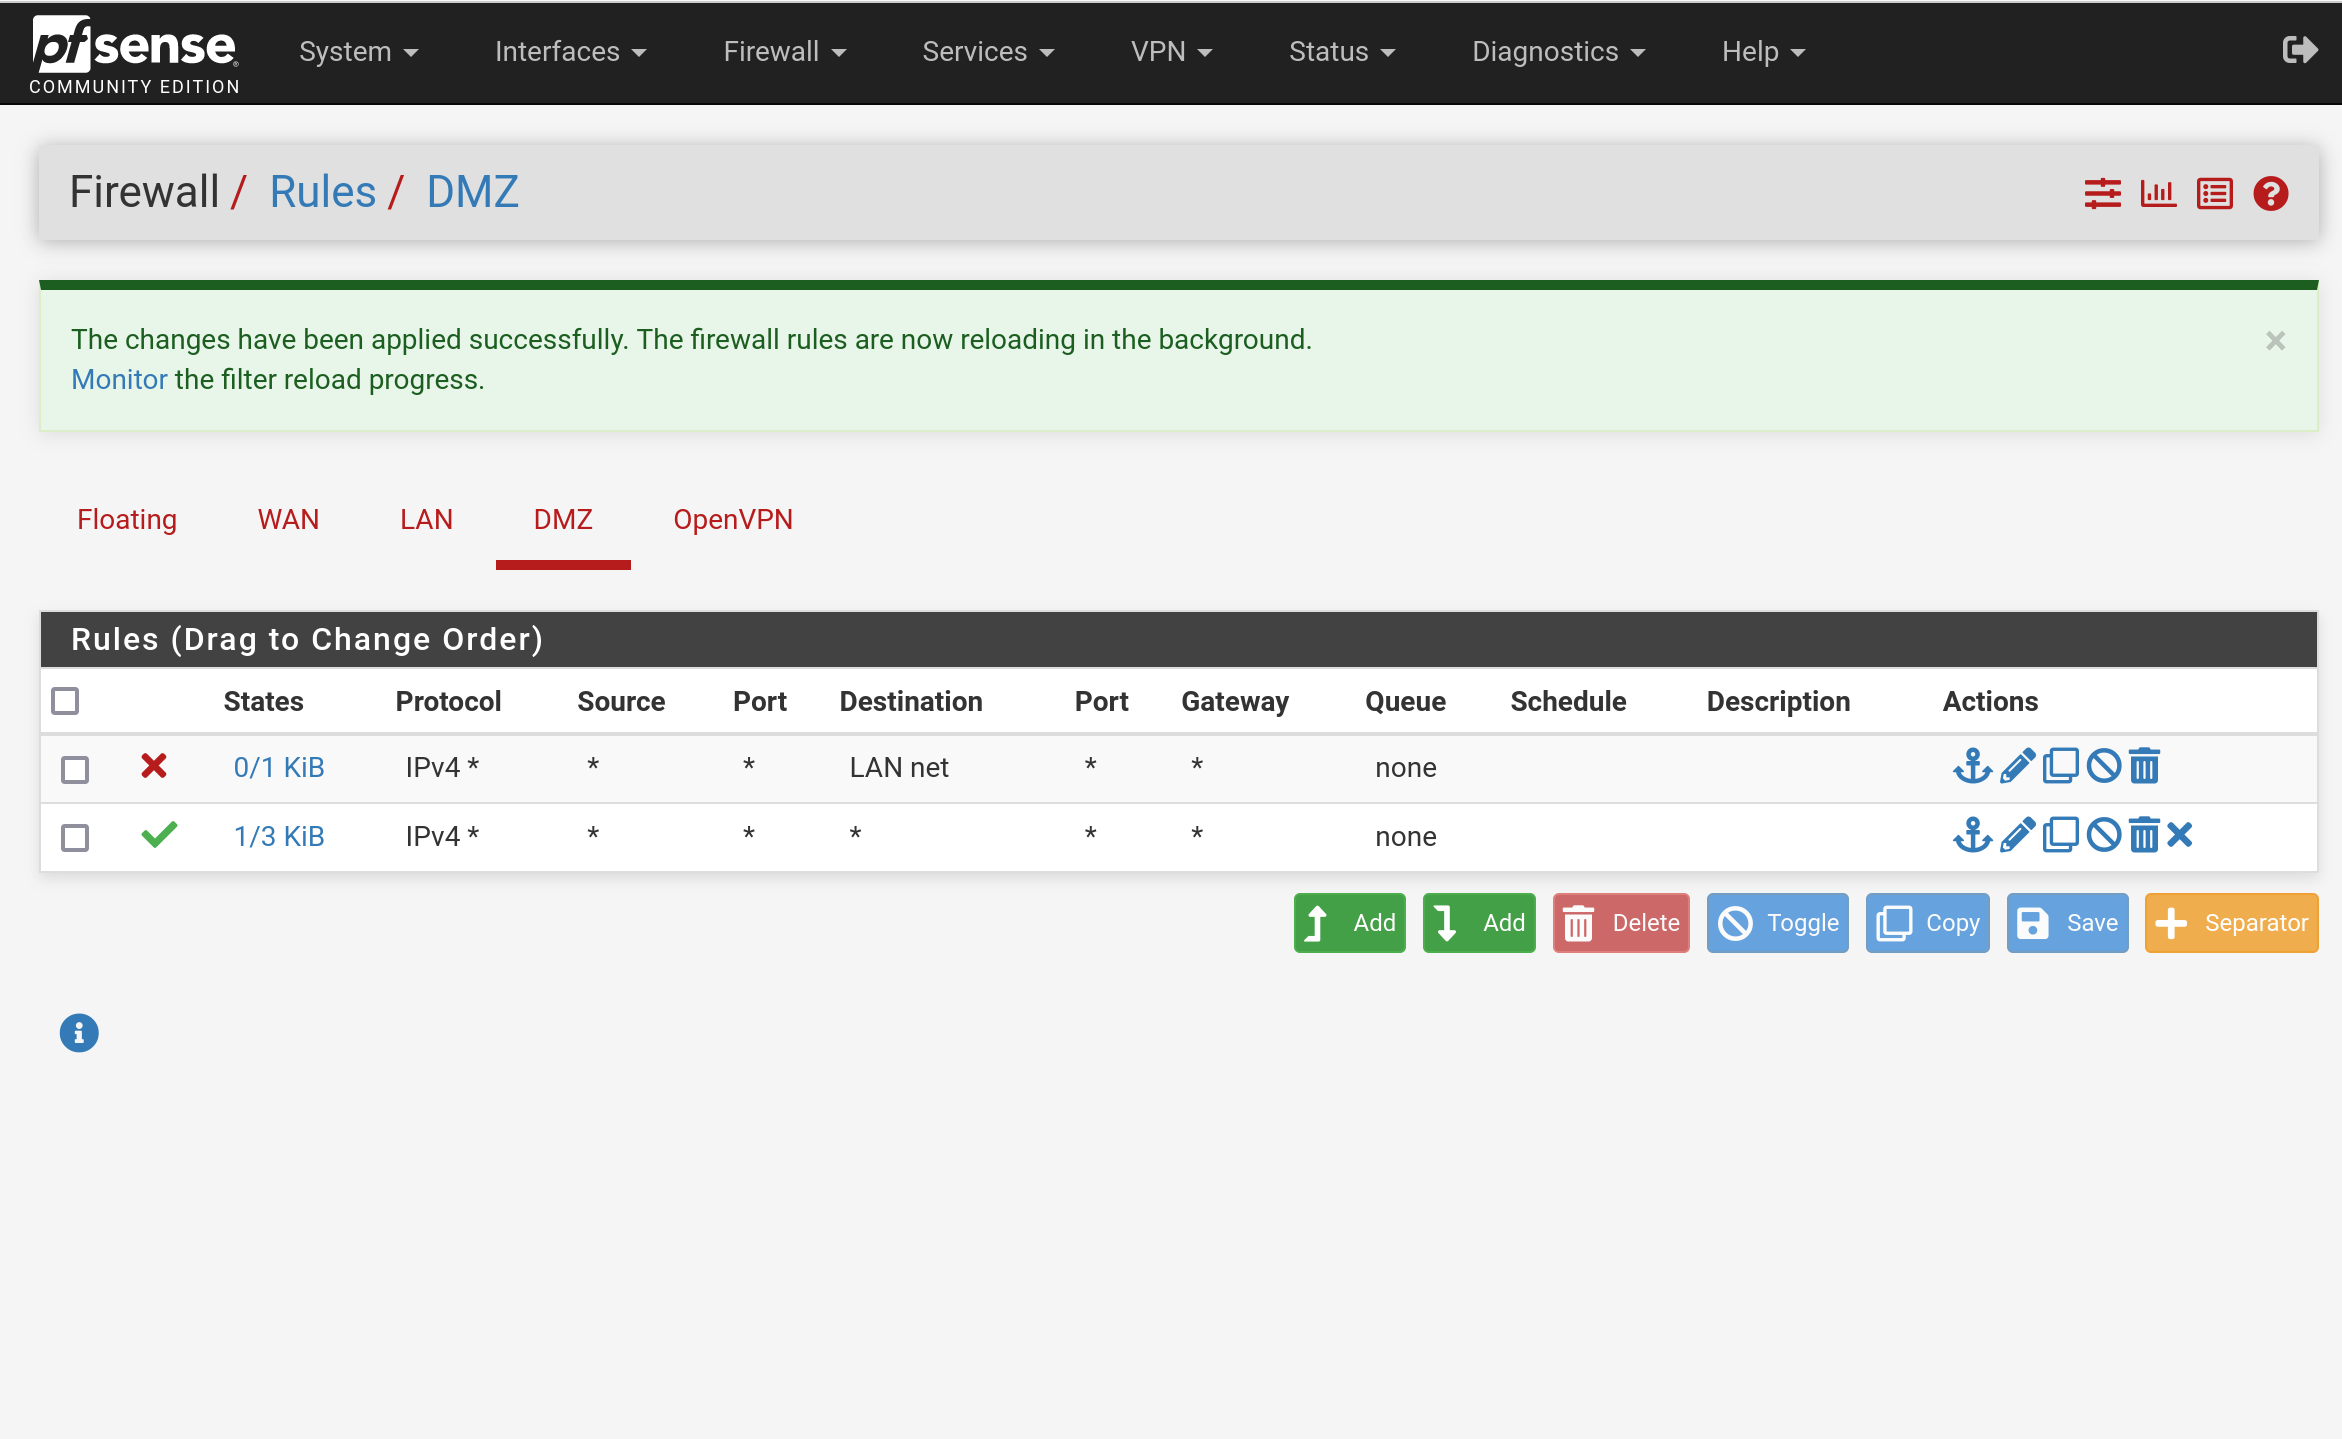
Finally, we need to block DMZ traffic from reaching the LAN. This is a one-way rule. Your LAN by default is able to reach the DMZ without any rule changes or additions.
Let's specify a new rule. Click Firewall > Rules, select DMZ then click the green Add button to add a new rule to the bottom of the list.
On the next page, select the following options:
Action: Block
Interface: DMZ
Protocol: Any
Source: Any
Destination: LAN net
Click Save
Next, we need to create an additional entry to allow traffic to move from the DMZ to the WAN. To do this, click the add button with the down arrow so the rule is listed under the one we just created. This ensures we continue to block access to the LAN from the DMZ.
On the next page, select the following options:
Action: Pass
Interface: DMZ
Protocol: Any
Source: Any
Destination: Any
Click Save
Configure dynamic DNS on pfSense
Because most residential ISP connections offer dynamically assigned IP addresses to their customers, your IP assigned today is not guaranteed to be your IP assigned tomorrow. This presents a problem for serving assets from our homes as the addresses need to stay static to point domains to them. Thankfully, there are dynamic DNS (domain name system) providers available that automatically update changes to your public IP address in real time. They do this by running a small program on an end-point on your network that reports back any changes and points the domain to your network. pfSense has a built-in dDNS service that is easy to setup so let's get it going.
First thing to do is sign up for a dDNS service and select a dDNS hostname. I chose NoIP but most dDNS services are supported on pfSense. For a list of supported providers, check out this docs page.
Once you choose a provider and setup your dDNS hostname, come back to the pfSense dashboard and select Services > Dynamic DNS. Then on the next page, click the green +Add button
Specify the following settings:
Service Type: Select your DNS provider
Interface to monitor: Select WAN
Hostname: type your dDNS hostname in the format specified
Enter in your dDNS Username and Password, following the instructions on the page and then click Save & Force Update.
This will connect your pfSense router to your dDNS provider and send your WAN IP address. If this works, you will see a green checkmark under Status for your dDNS provider along with your public IP address in green.
Optional: Top-Level Domain Pointing
Once you have the dynamic hostname working, you have the option of pointing a top-level domain to it using a CNAME and ALIAS entry in your DNS settings. Consult your registrar's documentation for how to do this properly as it can vary from provider to provider.
Web server setup: install Ubuntu
For our web server, we can use practically any spare computer or even a VM. The only requirement is the server must be inside the DMZ to function. For this guide, we are going to setup a bare-metal web server and connect it directly to the DMZ via ethernet.
I've selected a quiet and energy-efficient micro PC for my web server: a Lenovo ThinkCentre M700. These can be found on ebay for under $150. Mine features a Core i3-8250 with 8GB of RAM and a 128GB mSATA SSD. We will be installing Ubuntu Server 22.04.2 LTS as the operating system. Let's begin by creating the install media for Ubuntu.
Download Ubuntu Server 22.04.2 LTS from Ubuntu's website.
We are going to use Balena Etcher again to create our USB boot drive. Insert your thumbdrive and open Balena Etcher. Select the downloaded Ubuntu ISO image and then select your thumbdrive. NOTE: This will erase everything on your thumbdrive so please be mindful!
Create the bootable thumbdrive and when finished insert it into your web server.
Turn on the computer and follow your systems instructions for booting from the USB drive. If you're setting up a ThinkCentre like mine, then on power up immediately press Enter to open the boot options menu. From here, let's enter the BIOS by pressing F2 and set the power settings to Always On so that our web server will automatically restart in the event of a power outage. Save the settings and reboot. Press Enter again to get to the boot menu. Select the Ubuntu thumbdrive and continuing booting. Follow these steps to get Ubuntu installed and running:
- On the GRUB bootloader, select Try or Install Ubuntu
- Select your language
- Select Continue without updating (we will perform an update later)
- Select keyboard layout
- For type of install, select the default Ubuntu Server
- Network connections screen: take note of the IP address assigned to your server as we will need this later
- Bypass proxy settings and mirror
- Guided storage configuration: unmark Set up this disk as an LVM group by pressing the space bar and select Done. Confirm changes on the next screen and finally Confirm destructive action by selecting Continue
- Create your account credentials
- Skip Ubuntu Pro
- SSH setup: mark Install OpenSSH server by pressing the spacebar
- Bypass Featured Server Snaps and let the installer compete.
- Reboot when prompted and remove USB thumbdrive.
Web server setup: software configuration
Login to Ubuntu and issue the following commands to update the system
# Update package lists
sudo apt-get update

# Update installed packages
sudo apt-get upgrade
Follow any prompts to enter your password
Install NGINX
NGINX is a fast hyper text transfer protocol (HTTP) web server that forms the foundation of our setup. Alternatively, you can install Apache2 if you choose, another popular open-source web server.
# Install NGINX
sudo apt-get install nginx
Install MySQL
Most web sites featured dynamic content for which we need a database server. MySQL is widely used and easy to configure.
# Install MySQL
sudo apt-get install mysql-server
Follow the instructions presented on the screen to setup a root user and configure the system
Install PHP
PHP is a popular scripting language that allows us to create dynamic, database driven web sites. This is the foundation for running popular applications like Wordpress, for example.
# Install PHP 8.1
sudo apt install php-cgi
sudo apt install php php-fpm php-cli
At this point, you should be able to navigate a browser to your server's IP address and be greeted by the NGINX install success page. Files for your web server are stored in the Linux directory /var/www/html To access this directory, we can either use SSH via a terminal or we can connect an FTP application like FileZilla to transfer files like html and php documents to the server. Let's install a FTP server to do that
Install vsftpd
# Install vsftpd
sudo apt-get install vsftpd
Set user permissions for the /var/www/html directory
# Add user to www-data group
sudo usermod -a -G www-data username

# Clean up ownership
sudo chown -R www-data:www-data /var/www/html

# Enable members of www-data group read and write access
sudo chmod -R g+rw /var/www/html

# Ensure future files keep this permission structure
sudo chmod -R g+rws /var/www/html
You should now be able to connect to your server IP address using SFTP on port 21 and browse to /var/www/html to upload files.
Enable UFW Firewall
The final step is setting up the Linux firewall to harden the security of our server from unauthorized traffic. While our pfsense router is already restricting inbound WAN communication to ports 80 and 443, it is best practice to enable the local firewall as well.
# Set default policies
sudo ufw default deny incoming
sudo ufw default allow outgoing

# Allow SSH on port 22
sudo ufw allow 22

# Allow HTTP and HTTPS
sudo ufw allow 80
sudo ufw allow 443

# Enable the firewall
sudo ufw enable
Conclusion and reference links
That's it! We have successfully enabled a web server on our home network. We can now build dynamic websites and host them right from our home. We can even install popular CMS systems like Wordpress or Ghost to use as a foundation for our site. I hope you found this guide helpful. Here are some reference links you can explore to go deeper:
UFW Firewall Setup
https://www.digitalocean.com/community/tutorials/how-to-set-up-a-firewall-with-ufw-on-ubuntu-20-04
vsftpd Setup
https://www.digitalocean.com/community/tutorials/how-to-set-up-vsftpd-for-a-user-s-directory-on-ubuntu-20-04
pfSense Install Guide
https://docs.netgate.com/pfsense/en/latest/install/index.html
pfSense dDNS providers
https://docs.netgate.com/pfsense/en/latest/services/dyndns/client.html#choosing-a-dynamic-dns-provider
Install SSL certificate for NGINX
https://www.digitalocean.com/community/tutorials/how-to-secure-nginx-with-let-s-encrypt-on-ubuntu-22-04